Blog
DIY Solar Power Station for Beginners: Sizing, Components & Step-by-Step Build
2026-06-20 | Calvin
Building your own solar power station is one of the most rewarding DIY projects you can take on — and it's far more accessible than it looks. With five core components and a clear sizing method, you can build a reliable, modular system for off-grid living, emergency backup, or RV and camping use, often at half the cost of a commercial unit.
The mistake most beginner guides make is handing you a parts list for their build without teaching you how to size a system for your needs. A 1,280Wh setup is perfect for charging phones and running lights on a weekend camping trip — and completely inadequate for running a fridge through a two-day outage. This guide fixes that. You'll learn the components, how to size each one from your actual energy use, and how to assemble it safely.
Part 1: The Five Core Components
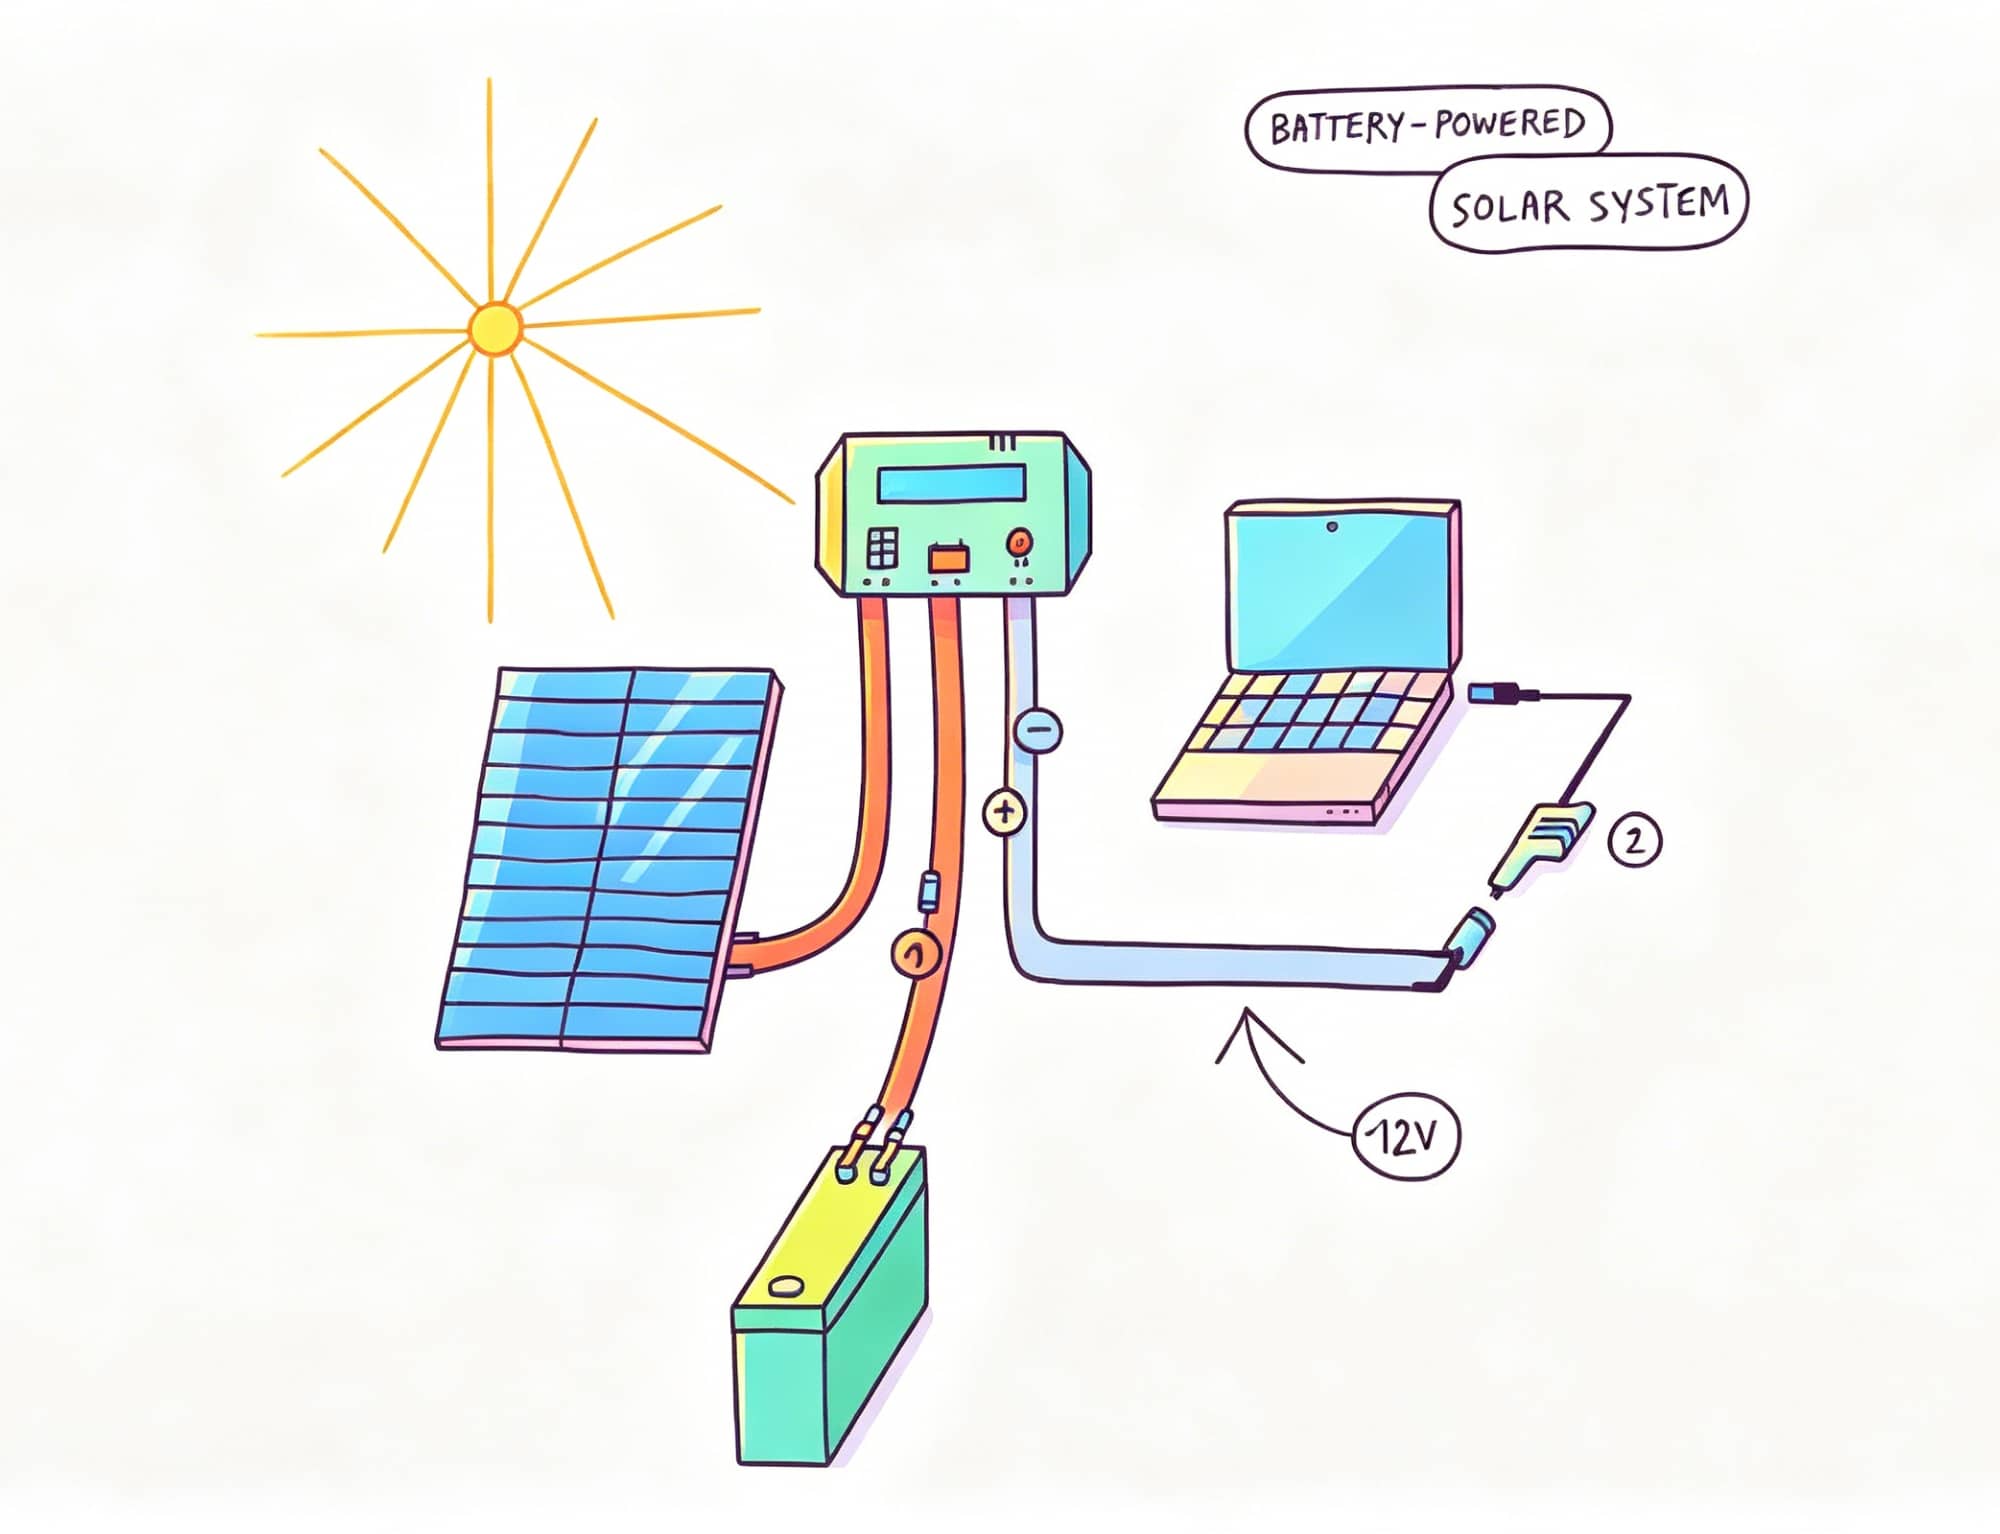
Every solar power station, from a 500Wh portable unit to a 10kWh off-grid system, is built from the same five building blocks:
1. LiFePO4 battery — stores the energy. Lithium iron phosphate is the standard choice for its long cycle life (3,000–5,000+ cycles), safety, deep-discharge tolerance, and built-in BMS protection.
2. Solar panels — collect energy from the sun and feed it to the charge controller.
3. MPPT charge controller — regulates the panel output to safely charge the battery. MPPT (Maximum Power Point Tracking) controllers are 20–30% more efficient than cheaper PWM units and are the correct choice for any system above 200W.
4. Inverter — converts the battery's 12V/24V/48V DC into 120V/230V AC to run household appliances. Always choose a pure sine wave inverter; modified sine wave damages sensitive electronics.
5. Wiring, fuses, and monitor — appropriately gauged cables, fuse protection at every connection point, and a battery monitor to track state of charge.
Part 2: Size Your System From Your Own Energy Use
This is the step that separates a system that works from one that disappoints. Follow it in order.
Step 1 — Calculate your daily energy use (Watt-hours)
List every device you'll run, multiply each device's wattage by the hours per day you'll use it, and add them up.
Example load:
- LED lights: 20W × 5 hours = 100Wh
- Phone/laptop charging: 60W × 3 hours = 180Wh
- 12V fridge: 50W × 24 hours (compressor cycles ~50%) ≈ 600Wh
- Fan: 40W × 6 hours = 240Wh
- Total: ≈ 1,120Wh per day
Step 2 — Size the battery bank
Divide daily Watt-hours by battery voltage to get amp-hours, then add margin for depth of discharge and inefficiency. LiFePO4 can safely discharge to ~90%, but sizing to ~80% usable extends life.
Battery capacity (Wh) = Daily Wh × 1.2 (inefficiency) ÷ 0.8 (usable DoD)
For 1,120Wh/day: 1,120 × 1.2 ÷ 0.8 = 1,680Wh minimum. A single 12V 100Ah LiFePO4 battery (1,280Wh) covers most of one day; two in parallel (2,560Wh) give comfortable headroom plus a partial reserve for a cloudy day.
For true off-grid reliability, multiply daily use by 2–3 days of autonomy to cover stretches of poor sun.
Step 3 — Size the solar array
Divide daily Watt-hours by your local peak sun hours (typically 3–5 depending on region and season), then add 20% for losses.
Solar watts = (Daily Wh ÷ Peak sun hours) × 1.2
For 1,120Wh/day at 4 peak sun hours: (1,120 ÷ 4) × 1.2 = 336W minimum. Four 100W panels (400W) provide a healthy margin and recharge the battery within a single good solar day.
Step 4 — Size the inverter
The inverter must handle your highest simultaneous load, not your daily total. Add up the wattage of everything that might run at once, then add 25% headroom.
Inverter rating = Peak simultaneous load × 1.25
If your largest concurrent draw is a 700W appliance plus 200W of other devices (900W), a 1,000–1,200W pure sine wave inverter is appropriate. Match the inverter's DC input voltage to your battery bank (12V here).
Step 5 — Size the charge controller
The controller must handle the array's maximum current. Divide total panel watts by battery voltage and add margin.
Controller amps = (Solar watts ÷ Battery voltage) × 1.25
For 400W of panels at 12V: (400 ÷ 12) × 1.25 = ~42A, so a 40–50A MPPT controller fits.
Part 3: A Complete Beginner Build (Worked Example)
Putting the sizing above into a real parts list for a ~1,100Wh/day system:
| Component | Specification | Role |
|---|---|---|
| Battery | 2 × 12V 100Ah LiFePO4 (2,560Wh) | Energy storage with built-in BMS |
| Solar panels | 4 × 100W (400W total) | Energy collection |
| Charge controller | 40A MPPT | Safe, efficient charging |
| Inverter | 1,000W pure sine wave, 12V→230V | DC-to-AC conversion |
| Wiring | 25mm² battery cables, fused | Connections and protection |
| Monitor | Battery voltage/SOC display | State-of-charge tracking |
This system weighs roughly 14kg, costs significantly less than an equivalent commercial power station, and is modular — batteries can be hot-swapped and panels added later.
Part 4: Step-by-Step Assembly
- Mount and protect the battery. Place the LiFePO4 battery in a ventilated enclosure. Install a fuse on the positive battery cable close to the terminal — this is your most important safety component.
- Connect the charge controller to the battery first. MPPT controllers must detect battery voltage before panel voltage to configure correctly. Connect the controller's battery terminals before its solar terminals.
- Connect the solar panels to the controller. With the battery already connected, attach the panel leads to the controller's solar input. Observe correct polarity.
- Connect the inverter to the battery. Use appropriately gauged cable (a 1,000W inverter at 12V can draw ~85A — size cable accordingly) with an inline fuse. Connect positive first, then negative.
- Install the monitor. Wire the battery monitor across the battery terminals to track state of charge.
- Test in sequence. Power on the controller and confirm it registers the battery and begins charging from the panels. Then power the inverter and test with a small load before connecting larger appliances.
Part 5: Safety Essentials
DIY solar is safe when built correctly, and dangerous when shortcuts are taken:
- Fuse every connection. Install appropriately rated fuses on the battery-to-controller, battery-to-inverter, and panel-to-controller lines. A short circuit in an unfused LiFePO4 system can deliver hundreds of amps instantly.
- Use correct cable gauge. Undersized cable overheats. Match cable to the maximum current each line carries — the inverter line is usually the heaviest.
- Keep 12V/24V where possible for beginners. Low-voltage DC is safer to handle. The 230V AC output stays isolated inside the inverter.
- Ventilate the battery. LiFePO4 doesn't off-gas like flooded lead-acid, but heat still needs to dissipate.
- Never charge LiFePO4 below 0°C without a self-heating battery — sub-freezing charging causes permanent damage.
Part 6: Scaling Up Later
The best part of a modular DIY system is that it grows with you:
- Add panels to recharge faster or capture more energy on short winter days.
- Add batteries in parallel to extend runtime and add cloudy-day reserve.
- Step up to 24V or 48V if your system grows beyond ~2,000Wh. Higher voltage means lower current for the same power, allowing thinner cables and lower losses — a 5,000W load draws ~417A at 12V but only ~104A at 48V.
- Add a grid charger to top up batteries during extended cloudy spells.
Frequently Asked Questions
What size solar power station do I need?
Size it from your daily energy use, not a fixed number. Add up the wattage of each device multiplied by hours of daily use to get total Watt-hours. For battery capacity, multiply daily Watt-hours by 1.2 (inefficiency) and divide by 0.8 (usable depth of discharge). For solar, divide daily Watt-hours by your local peak sun hours and add 20%. A typical weekend-camping setup needs ~1,000–1,500Wh; running a fridge full-time off-grid needs 3,000Wh or more with 2–3 days of battery autonomy.
Can I build a solar power station without being an electrician?
Yes. A low-voltage (12V/24V) DIY solar power station is a beginner-friendly project, provided you follow the correct assembly order, fuse every connection, and use proper cable gauges. The DC side stays at safe low voltages, and the 230V AC output is isolated within the inverter. For permanent home installations tied to mains wiring, or any 48V+ system, consult a qualified electrician for the AC connection.
Why use LiFePO4 instead of lead-acid for a solar power station?
LiFePO4 offers 3,000–5,000+ cycles versus 300–500 for lead-acid, roughly double the usable capacity (it safely discharges to ~90% versus 50% for lead-acid), weighs about half as much, and includes a built-in BMS for overcharge, over-discharge, and thermal protection. Though the upfront cost is higher, the cost per cycle over the system's life is far lower — making LiFePO4 the clear choice for solar storage.
What's the difference between MPPT and PWM charge controllers?
MPPT (Maximum Power Point Tracking) controllers actively optimize the voltage and current from the panels, extracting 20–30% more energy than PWM (Pulse Width Modulation) controllers. PWM is cheaper and acceptable for very small systems (under 200W). For any serious DIY solar power station, MPPT is the correct choice — the extra harvested energy quickly justifies the higher cost.
Conclusion
A DIY solar power station gives you genuine energy independence — and you don't need to be an electrician to build one. The key is to start with your own energy needs, not someone else's parts list. Calculate your daily Watt-hours, size each of the five components to match, assemble in the correct order with fuses on every line, and you'll have a system that reliably does what you built it for.
Start modest, build it safely, and expand as your needs grow. With LiFePO4 batteries, MPPT charging, and a pure sine wave inverter, your homemade solar setup can deliver clean, dependable power for a decade or more.
- Next:How to Charge a Deep Cycle Battery Correctly: Voltages, Stages & Chemistry-Specific Settings
- Previous:NMC vs NCA Battery Cell: What’s the difference?
Contact Details
Lithium LiFePO4 Batteries and Lithium LiFePO4 Cells Supplier - LiFePO4 Battery Shop
Contact Person: Miss. Elena Wang
WhatsApp : +8615263269227
Skype : +8615263269227
WeChat :15263269227
Email : info@lifepo4batteryshop.com
All Products
- TC Elcon Charger (0)
- Headway Lithium Battery (6)
- Blade Battery (10)
- Semi Solid State Battery (6)
- A123 Battery (6)
- Sinopoly Battery (7)
- GBS Battery (16)
- CALB Battery (26)
- Cylindrical Cell (14)
- Energy Storage System (0)
- Battery Management System (15)
- Sodium ion Battery Cell (4)
- Lithium Titanate Battery (23)
- Ternary Lithium Battery Cell (12)
- REPT Battery (10)
- BYD Battery (5)
- CATL Battery (15)
- Thunder Sky Winston Battery (26)
- EVE Battery (37)
- LiFePO4 Battery Cell (31)
Certification
Customer Reviews
- I have fond memories of our meeting in Shanghai with LiFePO4 Battery Shop Elena. Your company left a strong impression on me with its impressive growth and professionalism. We both value straightforwardness and honesty, which I believe are the most important qualities in any partnership. I am confident that we can build a successful collaboration based on these shared values. —— Robert from USA
- I've been working with LiFePO4 Battery Shop for years, and their reliability is unmatched. While other suppliers frequently change sales teams, LiFePO4 Battery Shop has consistently provided exceptional service with a stable team. Their commitment to quality and customer support truly sets them apart. —— Henry from Australia