Blog
How to Charge LiFePO4 Batteries with Solar Power: A Complete Guide
2025-10-19 | Calvin
As renewable energy continues to gain momentum, solar power has emerged as a reliable and sustainable solution for charging LiFePO4 (Lithium Iron Phosphate) batteries. Known for their high safety, long cycle life, and environmental benefits, LiFePO4 batteries are an ideal match for solar energy systems—whether you're powering an off-grid cabin, RV, boat, or backup home system.
This comprehensive guide explains how to safely and efficiently charge LiFePO4 batteries using solar panels, the key components you'll need, and best practices for long-term performance.
Table of Contents
- 1. What Are LiFePO4 Batteries?
- 2. Why Use Solar Power to Charge LiFePO4 Batteries?
- 3. Required Components for a Solar Charging Setup
- 4. Step-by-Step Instructions to Charge LiFePO4 Batteries with Solar
- 5. Safety Tips and Best Practices
- 6. Conclusion
1. What Are LiFePO4 Batteries?
LiFePO4 batteries are a type of lithium-ion battery that offer several advantages:
- High energy density
- Long lifespan (typically 4000–6000 cycles)
- Enhanced thermal and chemical stability
- Lightweight and compact
- Eco-friendly and non-toxic
These properties make LiFePO4 batteries ideal for solar applications where reliability, longevity, and safety are critical.
2. Why Use Solar Power to Charge LiFePO4 Batteries?
Charging LiFePO4 batteries with solar panels offers a range of benefits:
✅ Environmentally Friendly
Solar energy is renewable, clean, and reduces dependence on fossil fuels, contributing to lower carbon emissions.
✅ Cost-Efficient in the Long Run
After the initial setup, solar systems can significantly cut energy costs, especially in off-grid scenarios.
✅ Ideal for Off-Grid Use
Whether you're camping, sailing, or living off-grid, solar + LiFePO4 provides a reliable, portable energy solution.
✅ Compatible Performance
LiFePO4 batteries can handle high charging currents and are compatible with solar MPPT charge controllers for efficient energy conversion.
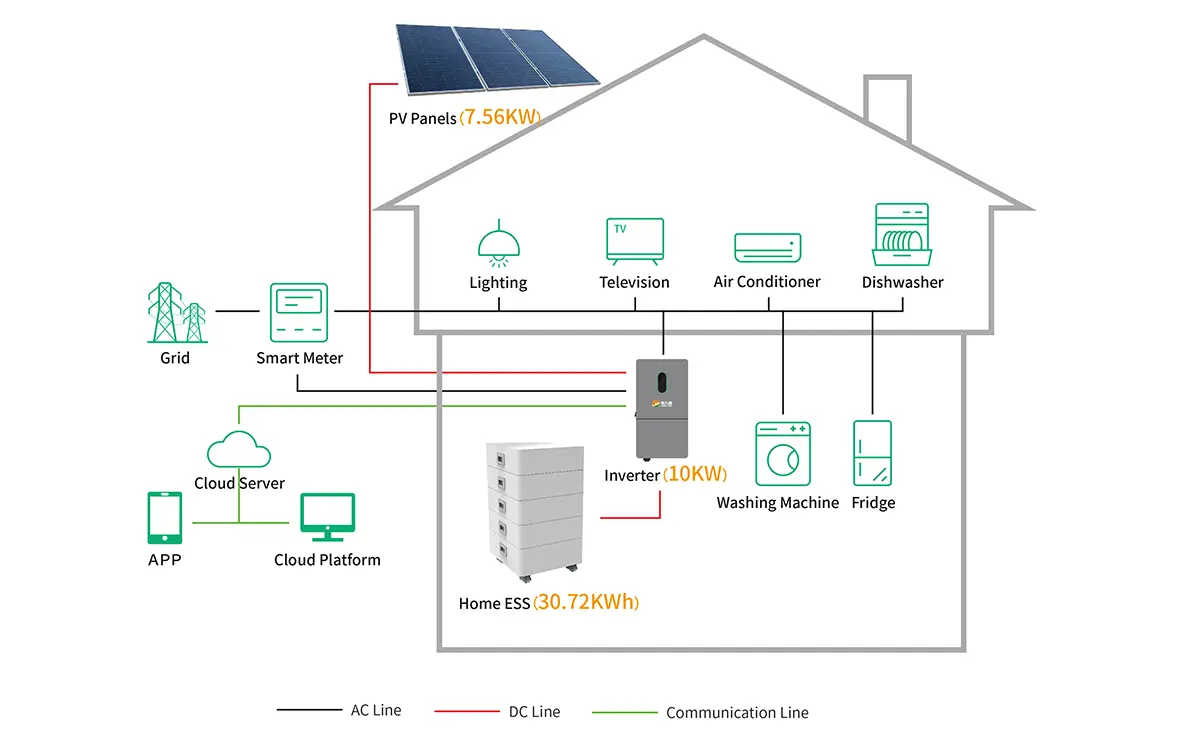
3. Required Components for Solar Charging Setup
To charge LiFePO4 batteries with solar, you’ll need the following:
- Solar Panels – Preferably monocrystalline panels for higher efficiency. Choose the panel wattage based on your energy needs.
- MPPT Charge Controller – Converts solar energy into stable charging voltage and current. MPPT is recommended for optimal performance with LiFePO4 batteries.
- LiFePO4 Battery – A quality battery with a built-in Battery Management System (BMS) for protection against overcharging, overheating, etc.
- Inverter (Optional) – Converts DC to AC if you plan to power AC appliances.
- Circuit Breakers / Fuses – For safety on the solar panel, battery, and load sides.
- Battery Monitor – Tracks voltage, current, and state of charge in real-time. Many offer Bluetooth for remote monitoring.
- Wiring & Connectors – Use high-quality cables sized correctly for your system to ensure efficiency and prevent voltage drops.
4. How to Charge LiFePO4 Batteries with Solar Power (Step-by-Step)
Step 1: Install and Position Solar Panels
- Place the panels in a location with full sun exposure.
- Tilt and orient panels based on your geographic location for optimal energy capture.
- Connect in series or parallel based on system voltage requirements.
Step 2: Connect the Charge Controller to the Battery
- Set the controller to LiFePO4 battery mode (most MPPT controllers offer this preset).
- Connect the battery first, following the polarity guidelines.
- Secure all terminals and connections.
Step 3: Optional – Connect the Inverter
- If you're running AC loads, install a compatible inverter.
- Connect the inverter directly to the battery terminals.
- Test the output before plugging in devices.
Step 4: Install the Battery Monitor
- Connect the monitor (with shunt) following the manufacturer’s guide.
- Use the monitor to track charge/discharge cycles and system performance.
Step 5: Connect the Solar Panels to the Charge Controller
- Make final connections from solar panels to the controller.
- Ensure correct polarity and secure with appropriate breakers.
- Install the system when the panels are not exposed to sunlight (e.g., face down or shaded).
Step 6: Begin Charging and Monitor the System
- Use the controller's display or mobile app to observe charging parameters.
- Monitor voltage, current, and temperature to ensure safe operation.
Step 7: Power Your Devices
- Once fully charged, power your DC or AC devices directly from the battery or inverter.
- Avoid discharging below the recommended depth of discharge (typically 80–90%) for maximum lifespan.
5. Safety Tips and Best Practices
- Use insulated tools and gloves when handling connections.
- Install the charge controller indoors or in a waterproof enclosure to avoid weather damage.
- Keep solar panels clean for optimal performance—wipe with a soft cloth periodically.
- Regularly inspect all connections for signs of wear or corrosion.
- Store batteries in a cool, dry place when not in use.
- Use components specifically compatible with LiFePO4 chemistry—especially the charge controller.
6. Conclusion
Charging your LiFePO4 batteries with solar power is one of the smartest, most sustainable energy choices available today. With the right components, proper setup, and regular maintenance, you can enjoy reliable, off-grid energy for years to come.
Whether you’re an RV enthusiast, a solar DIYer, or a homeowner preparing for emergencies, this guide equips you with the knowledge to build a safe, efficient, and future-proof solar charging system.
- Next:What Do Amp Hours Really Tell You About a Battery?
- Previous:Tesla Battery Types: A Simple Guide for Model S, 3, X, and Y
Contact Details
Lithium LiFePO4 Batteries and Lithium LiFePO4 Cells Supplier - LiFePO4 Battery Shop
Contact Person: Miss. Elena Wang
WhatsApp : +8615263269227
Skype : +8615263269227
WeChat :15263269227
Email : info@lifepo4batteryshop.com
All Products
- A123 Battery (5)
- Sinopoly Battery (7)
- GBS Battery (16)
- CALB Battery (22)
- Cylindrical Cell (3)
- Energy Storage System (0)
- Battery Management System (2)
- Sodium ion Battery Cell (3)
- Lithium Titanate Battery (16)
- Ternary Lithium Battery Cell (11)
- REPT Battery (8)
- BYD Battery (2)
- CATL Battery (14)
- Thunder Sky Winston Battery (21)
- EVE Battery (29)
- LiFePO4 Battery Cell (4)
Certification
Customer Reviews
- I have fond memories of our meeting in Shanghai with LiFePO4 Battery Shop Elena. Your company left a strong impression on me with its impressive growth and professionalism. We both value straightforwardness and honesty, which I believe are the most important qualities in any partnership. I am confident that we can build a successful collaboration based on these shared values. —— Robert from USA
- I've been working with LiFePO4 Battery Shop for years, and their reliability is unmatched. While other suppliers frequently change sales teams, LiFePO4 Battery Shop has consistently provided exceptional service with a stable team. Their commitment to quality and customer support truly sets them apart. —— Henry from Australia