Blog
How to Clean Your Battery Terminals: A Step-by-Step Guide
2025-09-13 | Calvin
If your car won’t start and you spot a white, blue or green “crust” on the battery posts, don’t panic — it’s usually terminal corrosion, not a dead battery. Corrosion blocks the electrical path between the battery and the car, so the starter and electronics get starved for current. With the right tools and a bit of care you can clean the terminals in 15–30 minutes and help extend battery life.
Table of Contents
- What is battery corrosion
- Causes of Battery Terminal Corrosion
- Step-by-step: how to clean battery terminals
- What to use for long-term protection
- Troubleshooting & when to replace the battery
- Pro tips
- Conclusion
What is battery corrosion
Corrosion on a lead-acid car battery usually looks like white or powdery blue/green deposits on the posts and cable clamps. It forms when hydrogen and acidic vapors escape from the battery and react with the metal of the terminal and clamp. That flaky buildup is a poor electrical conductor, so even a good battery can act like it’s weak if the connection is dirty.
Causes of Battery Terminal Corrosion
- Overcharging: If your car battery is overcharged, the fluid inside may expand and escape through overflow holes, coming into contact with the terminals. The acid from this overflow can create corrosion.
- Gas Escape: Every battery has small vents that release hydrogen gas during normal operation. If this gas escapes and comes into contact with the battery’s terminals or cables, corrosion can form.
- Age of the Battery: Batteries older than five years are more likely to corrode. As batteries age, corrosion becomes a natural side effect, and while cleaning can help temporarily, it’s often a sign that the battery needs replacing.
Step-by-step: how to clean battery terminals
Safety first
Battery acid is corrosive and batteries vent flammable hydrogen gas. Before you start:
- Work in a well-ventilated area.
- Wear chemical-resistant gloves and eye protection.
- Keep sparks and open flames away.
- Use insulated tools where possible and avoid touching both terminals with one metal tool.
Tools & materials
- Baking soda (sodium bicarbonate)
- Clean water (for rinsing)
- Stiff-bristle brush, wire brush, or terminal cleaning tool
- Dielectric grease or purpose-made battery terminal protector pads/sprays
- Shop towels / rags
- Protective gloves + safety goggles
- Socket or wrench set to loosen terminals
Once you’ve gathered, your materials, you’re ready to begin.
- Turn the car off and remove key. Let the vehicle sit for a minute.
- Disconnect cables — negative first (-/black), then positive (+/red). Tuck the loose cables away so they can’t fall back onto the posts.
- Inspect battery & cables. If the battery case is cracked, swollen, or leaking, don’t try to repair it — have it replaced. Check cable insulation and clamp condition; frayed or badly corroded clamps should be replaced.
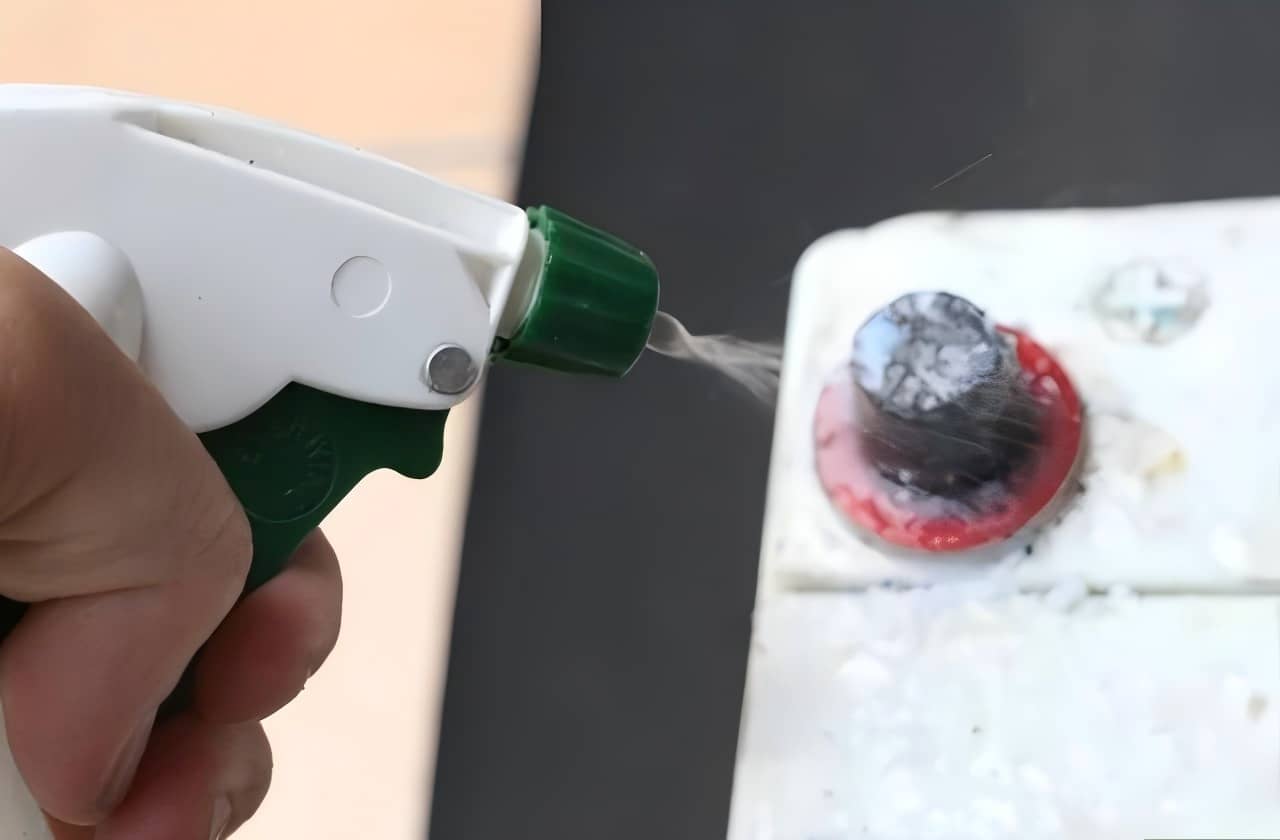
- Neutralize & scrub the corrosion. Make a paste (or light solution) of baking soda and water. Apply to the corroded areas — it will fizz as it neutralizes acidic deposits. Use your brush to scrub the post and underside of the clamp until metal is visible. Wipe away residue and rinse carefully with clean water. Avoid dumping lots of solution into battery vents — use small amounts and towel up runoff. Baking soda neutralization is a well-established, safe home method.
- Dry thoroughly. Use shop towels or compressed air and make sure everything is completely dry before reconnecting. Moisture + electricity is a recipe for rapid re-corrosion.
- Apply corrosion protection. Fit anti-corrosion felt washers or a thin film of dielectric grease to the clean post or clamp; alternatively use a purpose spray/sealer made for battery terminals. These products help block moisture and acid salts. (Note: dielectric grease is non-conductive — apply to the exposed surfaces after the metal-to-metal connection is made, or use protective washers/gels as directed by the product.)
- Reconnect cables — reverse the removal order: positive (+) first, then negative (-). Tighten clamps to a snug fit (don’t over-torque), check that the clamps don’t slip, and wipe away any final fingerprints or residue.
What to use for long-term protection
Recommended: dielectric grease or specialized battery protector gels/sprays and anti-corrosion felt washers — they’re built for terminals and keep moisture/acid salts away. Many parts stores sell inexpensive terminal protectors and sprays.
Common workaround: petroleum jelly (Vaseline) has been used historically. It can help short-term, but it may run under heat or attract grime; dielectric grease or a purpose-made protector is usually a better choice for longevity.
Troubleshooting & when to replace the battery
Cleaning helps if the battery itself is healthy but connections are fouled. If problems persist (slow cranking, dim lights, frequent stalls), get the battery tested.
Replace the battery if it’s older than 3–5 years, physically damaged, leaking, or fails a load test. Professional shops and many auto parts stores offer free battery testing and will recommend replacement if capacity is low.
Pro tips
- Clean terminals every 6–12 months in humid or coastal areas, or sooner if you see buildup.
- Keep a small tube of dielectric grease or a can of battery protector spray in your toolbox — they’re cheap insurance.
Conclusion
Battery terminal corrosion can significantly affect your car’s performance, but it’s an issue that’s easy to fix with a little bit of effort. By following these simple steps to clean your battery terminals, you can extend the life of your battery, improve your vehicle’s performance, and avoid being stranded with a car that won’t start.
- Next:Do LiFePO4 Batteries Need to Be Vented?
- Previous:Tesla Battery Types: A Simple Guide for Model S, 3, X, and Y
Contact Details
Lithium LiFePO4 Batteries and Lithium LiFePO4 Cells Supplier - LiFePO4 Battery Shop
Contact Person: Miss. Elena Wang
WhatsApp : +8615263269227
Skype : +8615263269227
WeChat :15263269227
Email : info@lifepo4batteryshop.com
All Products
- A123 Battery (5)
- Sinopoly Battery (7)
- GBS Battery (16)
- CALB Battery (22)
- Cylindrical Cell (3)
- Energy Storage System (0)
- Battery Management System (2)
- Sodium ion Battery Cell (3)
- Lithium Titanate Battery (16)
- Ternary Lithium Battery Cell (11)
- REPT Battery (8)
- BYD Battery (2)
- CATL Battery (14)
- Thunder Sky Winston Battery (21)
- EVE Battery (29)
- LiFePO4 Battery Cell (4)
Certification
Customer Reviews
- I have fond memories of our meeting in Shanghai with LiFePO4 Battery Shop Elena. Your company left a strong impression on me with its impressive growth and professionalism. We both value straightforwardness and honesty, which I believe are the most important qualities in any partnership. I am confident that we can build a successful collaboration based on these shared values. —— Robert from USA
- I've been working with LiFePO4 Battery Shop for years, and their reliability is unmatched. While other suppliers frequently change sales teams, LiFePO4 Battery Shop has consistently provided exceptional service with a stable team. Their commitment to quality and customer support truly sets them apart. —— Henry from Australia